Showing posts with label Natalie Hogan. Show all posts

Sunday, January 6, 2013

How to Make an Easy Delicious Pumpkin or Squash Pie

My Grandma Summers Pumpkin Pie Recipe
This recipe holds special meaning to me.  It was my Grandma Summer's Pumpkin Pie Recipe written in her hand and well used over the decades. It is a cherished possession.

The funny thing is, what my family called "Pumpkin Pie" was not Pumpkin Pie at all.  It was "Green Striped Cushaw Squash" Pie.  Whenever I ate Pumpkin Pie at someone else's house, I thought it was just terrible...heavy, thick, overly spiced and not sweet enough. It wasn't until I was almost an adult that I finally learned what I had been eating all those years was not pumpkin pie, but squash pie. My reaction was probably similar to how most people react when they learn Santa is not real...shock, initial disbelief and a little anger. The only difference was I was about 16, not 6.

Grandma called it simply "Crookneck Squash" and I have since learned Green Striped Cushaw is indeed one variety of crookneck squash. You cannot buy canned Green Striped Cushaw Squash. You must buy the whole squash and work it up (see my previous post on working up squash). 

Working up your own squash, pumpkin or sweet potato (basically the all the same process) and making your own crust (see my previous post on how to make pie crust) is really what makes a good pie. It's the same difference as buying hard preservative laden store bought cookies versus soft, warm made from scratch sugar cookies straight from the oven. Or using sweet, melt in your mouth butter over the plastic concoction commonly referred to as margarine. It's the difference between  sun ripened berries you personally plucked over a rubbery processed fruit roll up.

Yes, buying a frozen Mrs. Smith pie is easier but is it really worth it? When was the last time someone praised you extensively for going the extra mile by wheeling your grocery cart over to the bakery section of the grocery store and hefting a pie into your cart? 

"Oh my goodness, Marge!  Did you push that cart by yourself? And picked up the pie off the shelf, too? I wish I had your ability!" 

Here is my Grandma's no fail pie recipe:


My Grandma always made this pie in her blender. I use my food processor.  Begin by adding 2 cups squash (or pumpkin or sweet potato if you insist). 


Add 1 cup sugar. 


Add 3/4 cup milk.


Add the following:
2 eggs
1/4 teaspoon cinnamon
1/4 teaspoon allspice
1/8 teaspoon cloves
1/2 teaspoon vanilla
1 Tablespoon flour


Ready to mix.


It's never too early to teach the fine art of cooking. 


Once blended, the pie filling will look like this.  It is not thick.


Pour into a prepared unbaked pie crust. Bake at 425 degrees for about 50 minutes to an hour.  Pie is done when a knife inserted into middle comes out clean.


You can buy a fancy pie crust shield for about $5. I have no idea why I never have done so. I am cheap but usually not that cheap.  So, I always put aluminum foil around the edge of the pie to keep the exposed crust from burning. By this point in my life, I have probably used about $200 in aluminum foil for this purpose instead of investing $5 for a shield. Sometimes being too cheap costs you. 


The finished product was delicious. Add a dollop of whipped cream. This pie is worth the effort!

Saturday, October 20, 2012

How to Make Comfort Food: Stuffed Chicken Breast

Chicken has been selling for less than $2 pound on and off for several months. Most recently, this week (ending Oct. 23rd), Dillon's is selling skinless chicken breast for $1.89 a pound. I noticed Sam's Club had skinless chicken breast for $1.77 pound. As a result, we have been eating a lot of chicken at my house. I never thought I would miss good old hamburger.
 
Here is an easy chicken dish that looks gourmet but isn't: Stuffed Chicken Breast. It takes very little time to make and looks like you really put a lot of work into it.
 
 
To begin, you will need a box of stuffing mix. Any brand will work, I use the really cheap Wal-Mart Great Value brand. I cannot tell a difference between it and Stove Top. After all, it's just dried bread and some spices. You will also need an onion and a package of sausage. I bought this package of sausage at Apple Market when I it was on sale for 98 cents a package. This is shaping up to be a pretty cheap meal.
 
 
First fry the sausage will some onion. How much onion you put fry depends on how much you like onion. I like onion a lot.
 
 
Add some seasoning. I used salt, pepper and about a teaspoon of sage.

 
Sausage is greasy. Drain the sausage. You may want to keep the drippings to make gravy. I did.
 
 
Now, cook the stuffing mix according to the box directions. Most mixes just require you to boil some water and dump in the stuffing and spices. Easy and cheap.

 
Next, add the fried sausage mixture to the stuffing and stir.
 
 
Take one of your cheap chicken breasts you just bought on sale. I usually marinate mine in a little Hendrickson's salad dressing but you don't necessary have to do this. Trim off the fat.
 
 
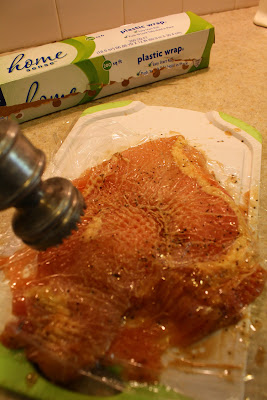
Now cover the chicken breast with a piece of plastic wrap and pound it thin. If you do not cover with plastic wrap, you will end up with raw chicken pieces all over your kitchen. Feeling a little stressed? This is great anger management therapy.

 
Congratulations! You have now successfully beat up a chicken. You probably have a great career ahead of you as a bouncer in a biker chicken bar. I know it looks a little yucky but deal with it.
 
 
Spread your sausage/chicken stuffing mixture on top of the pounded chicken breast. 

 
Just roll up the chicken breast and place in a greased pan, seam side down. If you have some stuffing mix left over, you can put it around the chicken breast.

 
Bake at 350 degrees for at least an hour. It may take longer depending on the size of the breast and how many you are baking. Never depend on the stated baking time, your oven may vary, the size of the breasts vary, the number of breasts, etc. Just set your timer and start checking after an hour. They are done when they are done but usually an hour is about right. I think these took about 75 minutes. Keep in mind stuffed chicken breast should reach an internal temperature of 165-170 degrees.  

 
I served with mashed potatoes and gravy. They were yummy.  

Monday, October 15, 2012

How to Make Easy Moist Banana Bread

I love fall. It's that time of the year you finally start feel like baking again. There is nothing more homey than the smell of something baking in the oven when you walk through the door on a crisp day.  I like those days where there is a chill in the air but it's still a little too warm to turn on the furnace for the first time...perfect baking weather!

A couple of weeks ago HyVee had bananas on sale for 29 cents a pound.  I bought a few too many so decided it was the perfect time to make a little banana bread. Banana bread can either be the most moist wonderful concoction in the world or the devil's dry dust. It's an art. I have spent most of my life working on finding the perfect banana bread recipe.

Here's a basic recipe I have played with over the years.  This recipe makes two loaves. To begin, cream 2 sticks butter (softened) with 2 cups sugar. Do not be fooled by this picture of my giant 4 cup measuring cup. It really is two cups sugar and 2 sticks butter or what I like to call a perfect start.


Now add four eggs and 2 teaspoons vanilla. Blend together.


Here's the secret to really good banana bread: ripe bananas. I mean pungent "black" bananas. Some people might consider throwing these bananas away just when they have achieved the perfect state of ripeness for banana bread. My Grandpa would only eat a banana once it was about the consistency of mush.


But what if you have over ripe bananas and aren't in the mood to bake?  That's easy. Just peel the bananas and place in a plastic bag. Freeze. Take out another day, thaw and bake away. You will not be able to tell a difference.

 
Add 4-6 bananas and blend.


Most recipes tell you to mix all your dry ingredients together and then gradually mix into cream mixture. I'll be honest, I usually just throw in a half teaspoon salt and 2 teaspoons baking soda. Then I gradually add 3 cups of flour, about a cup at a time until blended. But hey, if you want to do it right, mix all three dry ingredients first, then add flour mixture slowly, though I have a feeling it won't make a lot of difference.

 
The second secret to great banana bread is to not over work the batter. Mixing too long will make the bread "tough".


Just mix until all ingredients are combined. It will be about the consistency of pudding.
 
 
Preheat your oven. I usually bake my banana bread at about 325 degrees. Be sure and grease your loaf pans.
 
 
The real challenge is how long to bake the bread. Many recipes will say 35-45 minutes. Who are they kidding? Mine usually takes at least an hour and often longer. I think every batch is different. The consistency of the bananas will likely change the baking time. So set your timer for about 50 minutes and start checking every 10 minutes after that. Of course, it is done when a knife stuck into the bread comes out smoothly. Anything else you add to this batter, such as nuts, will also likely affect the cooking time. Now is not the time to indulge your ADHD tendencies. You have to focus and check the bread. Don't go off and forget it.


If you stay focused, you should be rewarded with a perfect loaf of banana bread. Wait a few minutes for it to cool before slicing.
 
 
The best thing about making your own banana bread is you can make the slices as large as you want. As demonstrated in this picture, my husband seems to think a third of a loaf is a good portion size. Yummers!

Saturday, September 29, 2012

How to Make a Cute Inexpensive Headboard

I had been wanting a headboard for my guest bedroom for a long time. I had envisioned one of those leather looking headboards but they were quite expensive. I even considered buying plywood, batting and leather looking vinyl to make my own headboard. Even that would have cost more than I wanted to spend.
My Guest Bedroom
So I finally decided to re-purpose a picture I bought from my sister's garage sale. These type of pictures are easy to find and much less expensive than an actual headboard. I simply hung the picture low on the wall where the headboard would normally go. Ta da! Instant beautiful, bright headboard without the work or expense of making one. You see these type of pictures at garage sales, Craigslist and thrift stores quite frequently.

Repurposed Picture

This idea may be to unconventional for some but I really enjoy it. First, it always reminds me of my sister. When she had this picture it hung over a bright red couch in her soft yellow living room next to a wall of large windows with plants. I loved her living room because it was so vibrant and cheery.


My Headboard

I hate the tern "think outside the box" so let's just say "think outside the headboard". Instead of a headboard why not hang a picture? If not a large picture, maybe even a series of three or four smaller pictures. I even considered painting a "headboard" picture on the wall. What neat headboard ideas have you come up with? Please share!

Tuesday, September 25, 2012

Pumpkin Spice Muffins with Cream Cheese Filling

One box spice cake mix and one can pumpkin

A friend recently asked me, "Where do you get your recipes?" Well, this recipe came from a small, white  haired lady I met at the grocery store. We literally bumped into each other as we were both reaching for Spice Cake Mix.

She said, "I need this to make my famous Pumpkin Spice Cake Muffins. My family loves them!" 

"That sounds delicious," I responded. "I wish I had your recipe."

"I'll give it to you," she smiled.

Right there in the aisle of Dillon's, I wrote her recipe on the box.

"Take one box spice mix and add a can of pumpkin and half a cup of water. Mix and bake," she confided.

"Really!" I said surprised. "No oil or eggs?"

"No. Just cake mix, pumpkin and water," she stressed.

She was so convincing, I purchased three boxes of Spice Cake mix because she said they are hard to find and only sold in the fall.


Ad one half cup water
Mix pumpkin, cake mix and water together
If you have a three year old handy wearing an Iron Man costume, it is acceptable to allow him to mix the three ingredients. If you do not have a three year old available, you may mix the ingredients yourself, though it may be difficult to find an Iron Man costume in your size.

It's OK to lick the beater because there is no egg
For the cream cheese filling you will need one package cream cheese,
one egg and half a cup of powdered sugar. Mix together.
It has been my experience that if a three year old says,
"But Nana, I really do know how to crack eggs,"
you should not necessarily believe them. Three year olds
often over-estimate their cooking abilities.

Beat the cream cheese, powdered sugar and egg together
Keep the three year old busy putting paper cups in muffin tins

Fill cups about third full with cake batter/pumpkin mix. Put about a teaspoon
of cream cheese filling on top of cake mixture.

It will look something like this...
Now put some cake mixture on top of the filling.

To make struesel, put half cup of flour, quarter cup of brown sugar,
half a stick of butter and half a teaspoon of cinnamon in a bowl

Mix together with a fork until crumbly

Place struesel on top of muffins and bake at 350 degrees for
about 20 minutes.
 I have to admit I was worried. The cupcake/muffin batter seemed exceptionally thick. I kept imagining the little old lady driving home and saying, "Oh, My! I forgot to tell that young lady to add half a cup of milk!"

They ended up being quite delicious. Without the cream cheese filling, I think they would have been pretty dense but you can try it and decide what you think.
Pretty muffins on cake stand

A friend made me this cake stand

Simply take an inexpensive glass candle holder (like you find at the
dollar store) andsuper glue it to an old fashioned, attractive plate
(the kind you see everywhere including the thrift store, garage
sales or probably your cupboard)